
Cables and Housing
- Mar 29, 2023
- 3 min read
The shifting and braking system on my bike is just a set of cables that tighten and loosen with levers on the handlebars. They need to be properly attached to the bike, protected inside of cable housing, and adjusted so the shifting and brakes work correctly. This post will just be about getting them attached to the bike.
On my handlebars, I have two sets of levers: brake levers clamped onto the ends of the bars where my hands will grip, and shift levers attached to the "bull horn" ends of my bars. There are two different types of cables and cable housing depending on which system you're working on. Brake cables and housing are thicker, stronger, and allow for a bit of flex. This flex is important so it can handle the force when you apply the brakes. Shifter cables and housing are thinner and more rigid, allowing for precise movement between gears.
The first step is to figure out the cable routing for your bike frame. The cable routing on this bike is almost identical to the routing on my old bike, so I had a bit of a head start on this one. I started with my brakes. Traditionally, the right brake lever controls the rear brake. The cable wraps around the front of the bike, runs down the left side of the top tube, and attaches to the brake cantilever in the back. The left brake lever controls the front brake, so the cable goes straight from the brake lever to the front brake cantilever.
My bike frame has two "braze-ons" on the left side of the top tube that the brake cable housing nests into. I needed to cut cable housing that runs between the brake lever and the front braze-on, and then another length of cable housing from the rear braze-on to the rear brake cantilever. When measuring cable housing length, I turned my handlebars side to side to make sure the housing would not restrict turning movement. I chose a length that is as short as possible without making a kink or extreme angle in the cable housing. Once cut, I smoothed down each end of the housing to remove any sharp edges. Then, I installed a little cap to keep everything clean.

(The photo above is actually the shift cable housing, but the process is the same.) I did similar measurements for all of the shift cable housing. Just like the brake levers, the right shifter controls the rear derailleur (rear gears), and the left shifter controls the front derailleur (front gears). My bike frame does not have braze-ons on the down tube of the frame for the shift cable like it does for the brake cable housing, but it does have mounts for these little doodads that nest with the shift cable housing. They also have a barrel adjuster, which allows you to make small cable tension adjustments without undoing the cable.

(The bar-end shifters and the down tube barrel adjuster thingies both came from my old bike! I enjoy that parts of the bike still live on, even though the frame is toast.)
The shift cables both run alongside the down tube of the frame, then wrap underneath the bottom bracket. From there, the front derailleur cable goes straight to the front derailleur. The rear cable runs along the chain stay to a braze-on, and then runs through another piece of housing to the rear derailleur.
When I was done measuring, I had 3 pieces of brake cable housing (orange), 3 pieces of shift cable housing (pink), 2 brake cables, and 2 shift cables.

The picture above also has two "noodles" in the center which are part of the brake cantilevers.
The next part is the most fun! Starting at the lever, I installed the cable, ran it through the housing, and then attached it at the end! Here is how the brake cable attaches to the brake levers:

And here is the brake cable and housing installed.

The cable runs through the housing, and then through one of those noodles before getting clamped onto the brake cantilever.
The extra slack in the cables gets trimmed once adjustments are made. Here is how the shift cable attaches to the bar-end shifters:

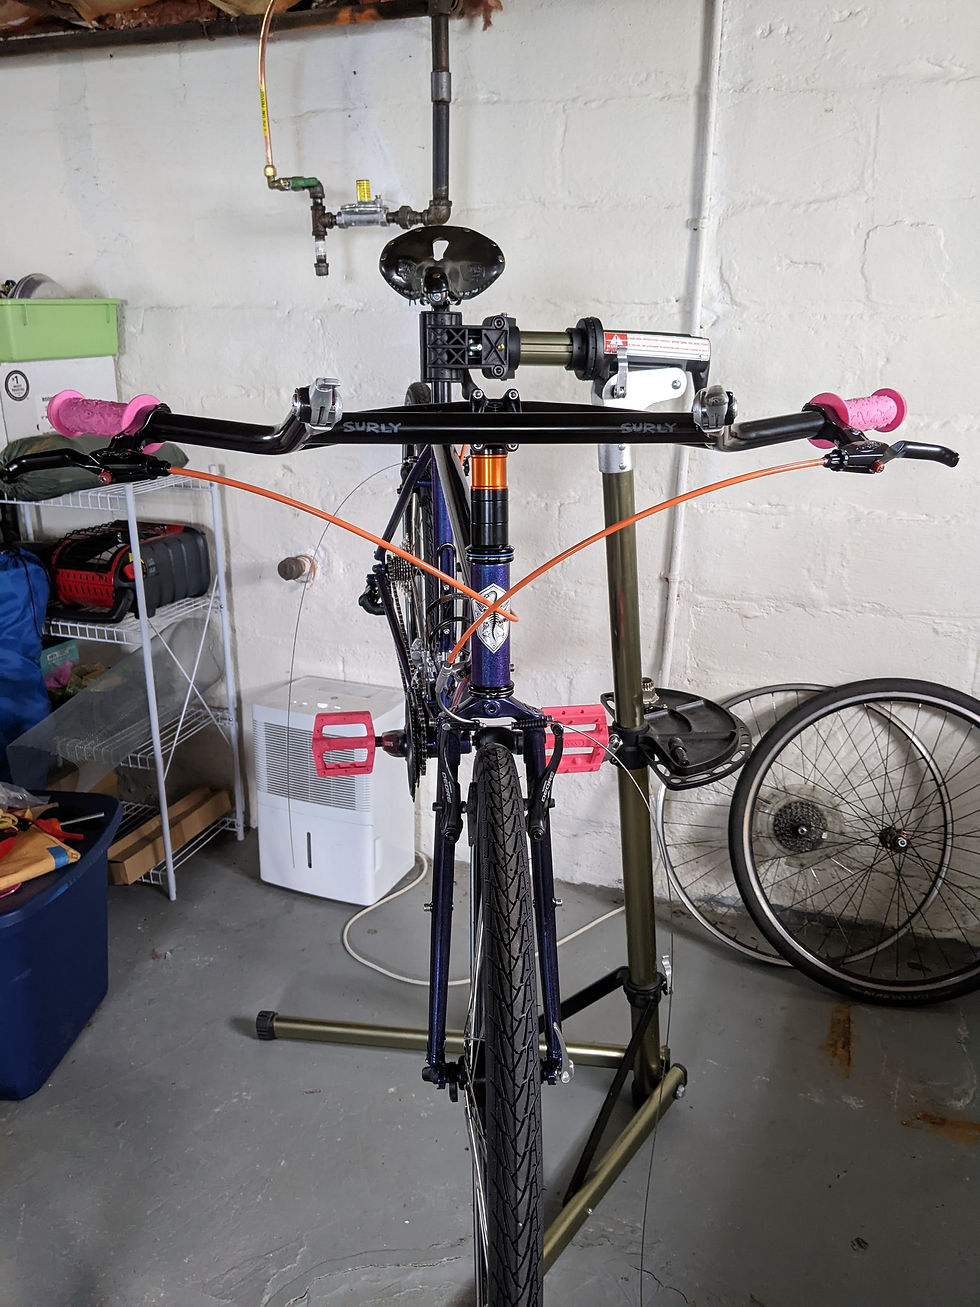
Front view after I installed the shift cable housing!

And here's the rear shift cable housing:

That's all for now! Tuning the tension and alignment of the brakes and derailleurs is a post for another day.


Comments